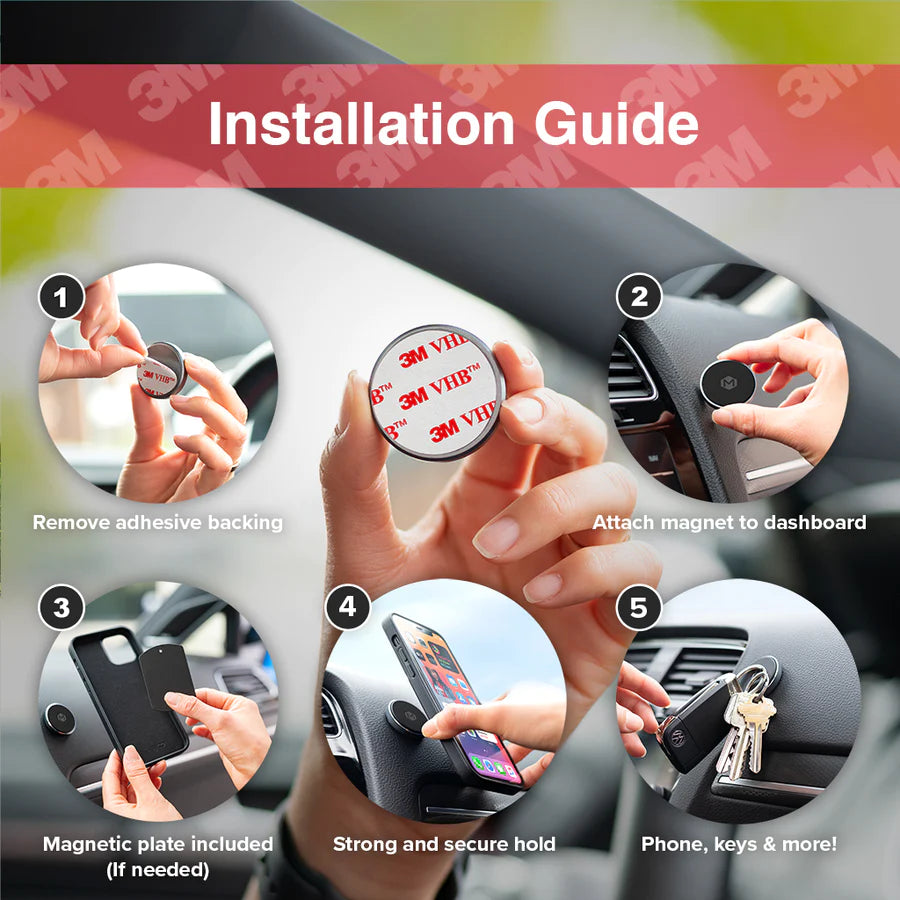
To install a car phone holder, clean the mounting surface, apply the suction cup or adhesive, and secure the device firmly.
Mastering the perfect placement for your mobile device is a game-changer for safer, more convenient driving. Over my years of testing various vehicle accessories, I have learned that the key to a stress-free experience is not just buying a premium product, but knowing exactly how to install a car phone holder for maximum stability.
Whether you are dealing with a suction cup mount on your windshield or a clip style for your air vents, the process requires a bit of patience and attention to detail. Let’s walk through the exact steps to ensure your phone stays put, no matter how bumpy the road gets.

Choosing the Best Location for Your Holder
The first step in learning how to install a car phone holder is identifying the optimal spot. You want your device to be within reach for navigation or music control without obstructing your field of vision. Placing the mount too high on the windshield can create a blind spot, while putting it too low on the dashboard might require you to take your eyes off the road for too long.
Consider the ergonomics of your cockpit before you finalize the position. If you use a vent mount, ensure the weight of your phone does not cause your air louvers to tilt downward constantly. I personally prefer mounting my phone near the center console, slightly above the radio, as it keeps my peripheral vision clear while maintaining a quick glance for GPS directions.
Source: themightymount.com
Preparing the Surface for Maximum Adhesion
Before you actually mount the device, you must prep the surface properly. This is the most common mistake I see; people often skip the cleaning phase, leading to their mount falling off after a few hot days. Use a mixture of isopropyl alcohol and water to wipe down your dashboard or windshield. Even if the area looks clean, invisible oils from interior cleaners or dust will prevent the adhesive or suction cup from bonding correctly.
Once the surface is wiped, let it air dry completely. If you are using a suction cup, verify that the rubber is clean and free of lint. Sometimes, a tiny drop of water on a suction cup can create a stronger vacuum seal on a non-porous surface. Taking this extra minute to prepare the area is vital when you learn how to install a car phone holder properly.

Source: simply-brands.com
Step by Step Installation Process
Once the area is ready, the physical installation of the holder should be straightforward. Follow these steps to ensure a secure fit for your specific mount type.
- If using a suction cup, lift the locking lever, press the cup firmly against the glass or plastic, and then push the lever down to create the vacuum.
- For adhesive mounts, peel off the backing, press firmly for at least 30 seconds, and avoid placing any weight on it for at least 24 hours to let the bond cure.
- When using vent clips, hook the prongs behind the slats and push until you feel the tension lock the unit into place.
- Once the base is stable, attach the actual phone cradle to the base, ensuring all screws or tightening nuts are firmly secured.
- Finally, place your phone in the holder and adjust the angle to your preferred viewing position before tightening the main adjustment knob.

Source: com.au
Frequently Asked Questions of how to install a car phone holder
Can I install a car phone holder on a textured dashboard?
Suction cups often struggle with textured surfaces because they cannot form a perfect vacuum seal. You should use a smooth adhesive dashboard pad or disk to create a flat, non-porous area for the mount to grip.
Will the adhesive damage my car interior when I remove it?
Most high-quality automotive mounts use heat-activated or pressure-sensitive adhesives that can be removed with a bit of patience. Using a heat gun or hair dryer on a low setting can soften the glue and make removal safer for your plastic trim.
Why does my phone holder keep falling off the windshield?
The most likely culprit is a buildup of dust or oils on either the suction cup or the glass itself. Clean both surfaces with rubbing alcohol, and ensure the locking mechanism is engaged fully when you press it into place.
Is it safe to mount a phone holder over an airbag?
You should never place a phone mount in a position where it could interfere with the deployment of an airbag. Always check your vehicle manual to identify where your side and curtain airbags are located to avoid dangerous obstructions.
How often should I re-tighten my phone mount?
Temperature fluctuations inside a vehicle can cause plastic parts to expand and contract, loosening the fasteners over time. It is a good practice to check the stability of your mount every time you do a routine oil change or tire pressure check.
Conclusion
Learning how to install a car phone holder is a simple yet effective way to improve your overall driving experience. By cleaning your surfaces, selecting the right spot, and ensuring every bolt is tight, you can enjoy a clutter-free and safe trip every time you get behind the wheel.
Remember that consistency is key; check your mount periodically to make sure it remains secure during changing weather conditions. Now that you have the knowledge to set it up correctly, go ahead and secure your device for your next journey. If you found these tips helpful, feel free to share your own installation experiences or questions in the comments below!